So far we have taken a look at the block sidebar by adding InspectorControls to our custom blocks and adding controls to core and third party block sidebar with filters and Higher Order Components. In this guide we are going to look at adding controls to the post sidebar.

Display Settings in the Post Sidebar
In this guide we are going to create a ‘Display Settings’ control that will only allow logged in users to view the post when toggled.
Prerequisites
- Have followed the Creating a Plugin for the WordPress Block Editor (Gutenberg) guide
- Read the previous sidebar guides (sidebar for a custom block, and sidebar for an existing block)
- Read the Using Post Meta Fields to Store Attributes in the WordPress Block Editor (Gutenberg) guide
Registering the Post Meta in PHP
Please complete the steps in the create plugin guide to give us our initial plugin, we will expand on this in our guide.
After you have done this, let’s set up the post meta that we need for our permissions toggle control. Open up the root file of the plugin (in our case wholesome-plugin.php) and add the following code:
function wholesomecode_wholesome_plugin_register_post_meta() {
    register_meta(
        'post',
        '_wholesomecode_wholesome_plugin_require_login',
        [
            'auth_callback' => '__return_true',
            'default'       => false,
            'show_in_rest'  => true,
            'single'        => true,
            'type'          => 'boolean',
        ]
    );
}
add_action( 'init', 'wholesomecode_wholesome_plugin_register_post_meta' );
If you have taken a look at the post meta fields guide, this should look a little familiar. All it does is it allows our post meta to be accessed from within the block editor (Gutenberg).
Create the Sidebar Component
In your plugin create a new folder called components and create the following file /components/Sidebar.js. In that file paste the following code:
import { ToggleControl } from '@wordpress/components';
import { dispatch, select } from '@wordpress/data';
import { PluginDocumentSettingPanel } from '@wordpress/edit-post';
import { Component } from '@wordpress/element';
import { __ } from '@wordpress/i18n';

export default class Sidebar extends Component {
    render() {
        const meta = select( 'core/editor' ).getEditedPostAttribute( 'meta' );
        const exampleToggle = meta['_wholesomecode_wholesome_plugin_require_login'];

        return (
          <PluginDocumentSettingPanel
            name="wholesomecode-wholesome-plugin-sidebar"
            title={ __( 'Display Settings', 'wholesome-plugin' ) }
            >
            <ToggleControl
              checked={ exampleToggle }
              help={ __( 'User must be logged-in in to view this post.', 'wholesome-plugin' ) }
              label={ __( 'Require Login', 'wholesome-plugin' ) }
              onChange={ ( value ) => {
                dispatch( 'core/editor' ).editPost( {
                  meta: {
                    '_wholesomecode_wholesome_plugin_require_login': value,
                  },
                } );
              } }
              />
          </PluginDocumentSettingPanel>
        );
    }
}
The ToggleControl we have seen before in our previous sidebar guides, but the panel we are using is slightly new. We use PluginDocumentSettingPanel to identify that this control should appear in the post sidebar.
Also note that instead of pulling in attributes, we get our meta data with the following code:
const meta = select( 'core/editor' ).getEditedPostAttribute( 'meta' );
const exampleToggle = meta['_wholesomecode_wholesome_plugin_require_login'];
and we save it via our onChange method using this code:
onChange={ ( value ) => {
  dispatch( 'core/editor' ).editPost( {
    meta: {
      '_wholesomecode_wholesome_plugin_require_login': value,
    },
  } );
} }
This updates the meta of the current post. It won’t actually get saved until we save our post, so all the saving is handled for us.
Register the Sidebar
There is one last thing we need to do with our post sidebar, and that is to register it. At the top of the /src/index.js file add the following:
import { registerPlugin } from '@wordpress/plugins';
import render from './components/Sidebar';

registerPlugin(
    'wholesomecode-wholesome-plugin-sidebar',
    {
        icon: 'visibility',
        render,
    }
);
We really should think about altering the structure of our plugin so that the code that registers the block is imported from another file, but for simplicity we will use the same file.
Here we use registerPlugin to register the sidebar. We pass in the Sidebar component we created as the ‘render’ method, along with an icon.
Add the Hide if Logged Out Logic
Once again open the root file of the plugin (in our case wholesome-plugin.php) and drop in the following code. There are much better ways to do this, but I’m keeping it short for example purposes:
function wholesomecode_wholesome_plugin_require_login() {
    global $post, $wp_query;

    // If this is not a single post, bail.
    if ( is_admin() || ! is_singular() || ! $post ) {
        return;
    }

    // If the user is logged in, bail.
    if ( is_user_logged_in() ) {
        return;
    }

    $login_required = get_post_meta( $post->ID, '_wholesomecode_wholesome_plugin_require_login', true );

    // If the login is not required, bail.
    if ( ! $login_required ) {
        return;
    }

    $wp_query->set_404();
    status_header( 401 );
}
add_action( 'wp', 'wholesomecode_wholesome_plugin_require_login' );
This code simply returns our 404 template, and a status of 401 (Unauthorized) if the Toggle is set to true.
The Post Sidebar in Action
Let’s take a look at the post sidebar controls in action.
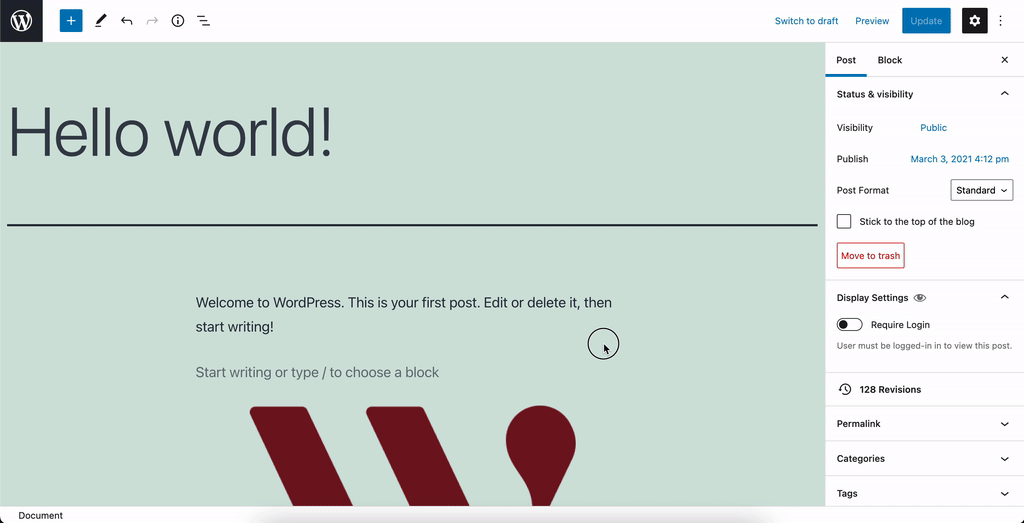
Controlling Permissions via the Post Sidebar
In this example we toggle the switch to true, view our page in a new (logged out) browser window and after a refresh see that it returns the 404 page, then toggle it to false, refresh and voilà, the post is visible again. Gutenberg Magic!
Extra: Taking it Further
- Have a look at creating a standalone custom sidebar
- Have a look at creating nested child blocks with the
InnerBlockscomponent - Have a look at using post meta fields in Gutenberg blocks (if you haven’t already) and Gutenberg Component Driven Custom Meta Boxes
- Have a look at creating a settings page with Gutenberg Components