There are several ways to use the block editor (Gutenberg) sidebar in WordPress. You can add controls for just the block, for other blocks, for the entire post, or a create a completely custom sidebar. In this guide we are going to start by looking at adding controls to the block sidebar with InspectorControls.
Using the block sidebar in WordPress Gutenberg
In this guide we will start off by building a simple control that allows us to set the text of the block (expanding what we built in the create plugin guide), and then we will look at adding more complex controls such as a colour picker and a toggle control to control the visibility of the block.
Prerequisites
- Have followed the Creating a Plugin for the WordPress Block Editor (Gutenberg) guide
Add your InspectorControls
Before you do anything, complete all of the steps in the create plugin guide. We will use this as our starting point.
When you want to add a control into the block sidebar, you use a component called InspectorControls which you import from @wordpress/block-editor, inside here you will put various Panels and Controls.
Open up /src/edit.js from the plugin you created and add the following code to the top of the file where you previously imported the RichText control :
import { InspectorControls, RichText, useBlockProps } from '@wordpress/block-editor';
import { Panel, PanelBody, TextControl } from '@wordpress/components';
Now replace the Edit method with the following:
export default function Edit( { attributes, isSelected, setAttributes } ) {
    const { blockText } = attributes;
    return [
        <InspectorControls>
            <Panel>
                <PanelBody
                    title={ __( 'Block Content Settings', 'wholesome-plugin' ) }
                    icon="admin-plugins"
                >
                    <TextControl
                        label={ __( 'Example Meta', 'wholesome-plugin' ) }
                        help={ __( 'This is an example meta field.', 'wholesome-plugin' ) }
                        onChange={ ( blockText ) => setAttributes( { blockText } ) }
                        value={ blockText }
                    />
                </PanelBody>
            </Panel>
        </InspectorControls>,
        <p { ...useBlockProps() } >
            <RichText
                className="block__text"
                keepPlaceholderOnFocus
                onChange={ ( blockText ) => setAttributes( { blockText } ) }
                placeholder={ __( 'Block Text', 'wholesome-plugin' ) }
                tagName="span"
                value={ blockText }
            />
        </p>
    ];
}
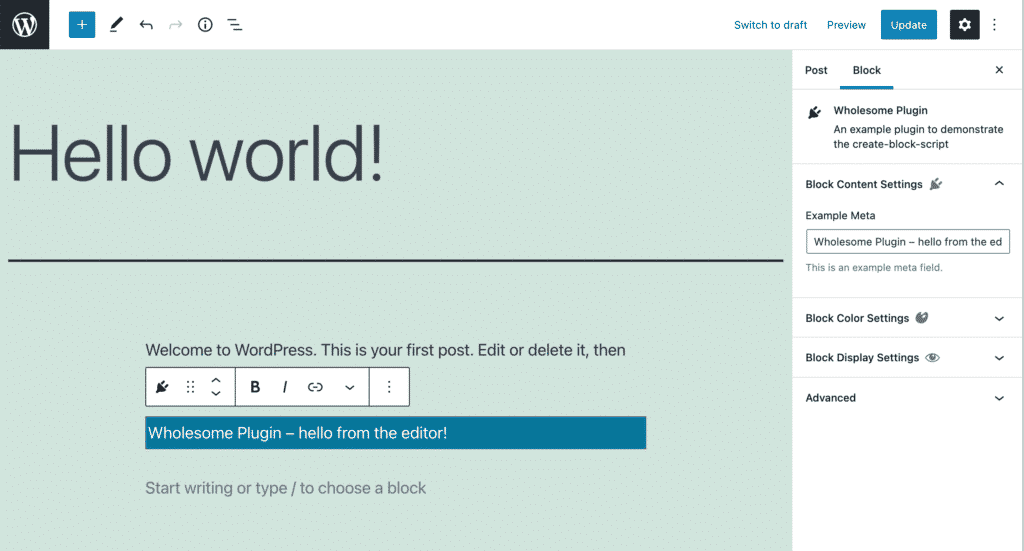
We have added a TextControl into the InspectorControls which will allow us to alter the same blockText attribute that we previously created.
One key thing to note is notice that our return is now outputting an array ([]) with the InspectorControls as one item, and the block edit output as the other item.
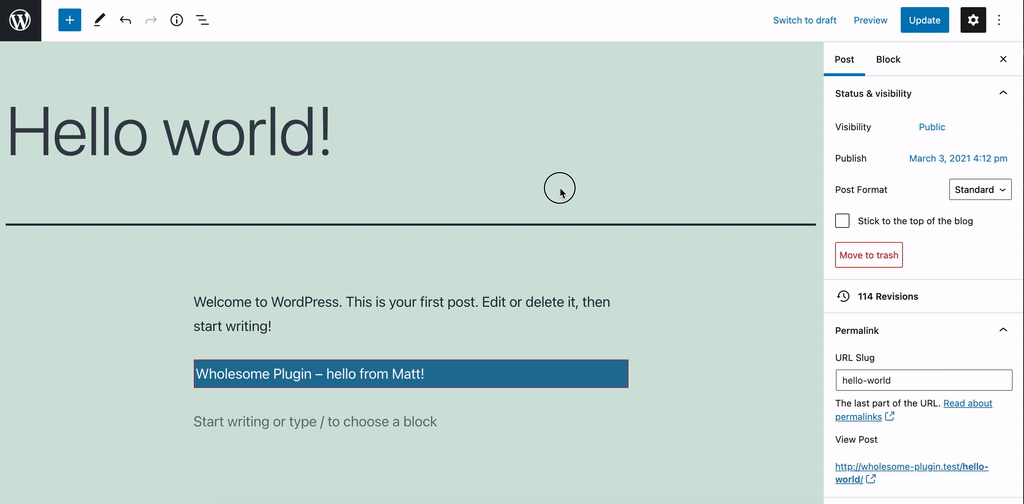
Be sure to compile your code using npm start and view the result:
Controlling the content with a TextControl
See that if we update the TextControl the RichText control also updates. This happens because they share the same attribute.
Colour Settings in the Sidebar
Let’s do something a little more complex and add a Colour Picker to our custom element. Like the one that appears if you select a normal paragraph block.
First let’s create some attributes, add the following in the usual place:
attributes: {
    blockColor: {
        type: 'string',
    },
    blockBackground: {
        type: 'string',
    },
    blockText: {
        default: 'Wholesome Plugin – hello from the editor!',
        type: 'string',
    },
},
Adjust your /src/edit.js file so that it contains a PanelColorSettings panel, and a ContrastChecker, like so:
import { ContrastChecker, InspectorControls, PanelColorSettings, RichText, useBlockProps } from '@wordpress/block-editor';
import { Panel, PanelBody, TextControl } from '@wordpress/components';
import { __ } from '@wordpress/i18n';

import './editor.scss';

export default function Edit( { attributes, isSelected, setAttributes } ) {
    const { blockBackground, blockColor, blockText } = attributes;
    return [
        <InspectorControls>
            <Panel>
                <PanelBody
                    title={ __( 'Block Content Settings', 'wholesome-plugin' ) }
                    icon="admin-plugins"
                >
                    <TextControl
                        label={ __( 'Example Meta', 'wholesome-plugin' ) }
                        help={ __( 'This is an example meta field.', 'wholesome-plugin' ) }
                        onChange={ ( blockText ) => setAttributes( { blockText } ) }
                        value={ blockText }
                    />
                </PanelBody>
                <PanelColorSettings
                    title={ __( 'Block Color Settings', 'wholesome-plugin' ) }
                    icon="art"
                    initialOpen={ false }
                    colorSettings={ [
                        {
                            value: blockColor,
                            onChange: ( blockColor ) =>  setAttributes( { blockColor } ),
                            label: __( 'Font Color', 'wholesome-plugin' )
                        },
                        {
                            value: blockBackground,
                            onChange: ( blockBackground ) =>  setAttributes( { blockBackground } ),
                            label: __( 'Background Color', 'wholesome-plugin' ),
                        }
                    ] }>
                        <ContrastChecker
                            isLargeText="false"
                            textColor={blockColor}
                            backgroundColor={blockBackground}
                        />
                </PanelColorSettings>
            </Panel>
        </InspectorControls>,
        <p
            { ...useBlockProps() }
            style={ {
                backgroundColor: blockBackground,
                color: blockColor,
            } }
        >
            <RichText
                className="block__text"
                keepPlaceholderOnFocus
                onChange={ ( blockText ) => setAttributes( { blockText } ) }
                placeholder={ __( 'Block Text', 'wholesome-plugin' ) }
                tagName="span"
                value={ blockText }
            />
        </p>
    ];
}
Finally in our /src/save.js replace the save method with the following:
export default function save( { attributes } ) {
const { blockBackground, blockColor, blockText } = attributes;
return (
{ blockText }
);
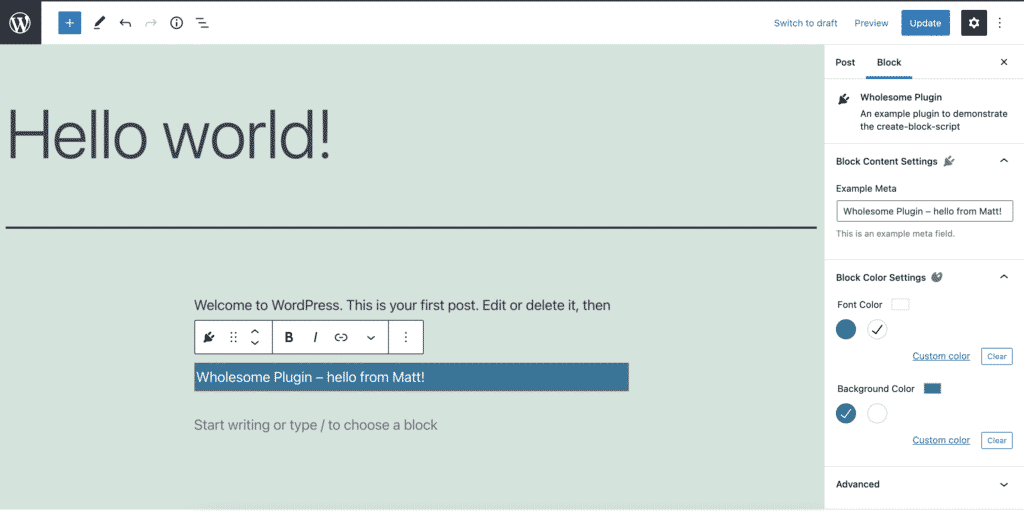
}Remember to compile using npm start and take a look at the result:
Our very own custom Colour Picker
We can now pick colours from the themes custom colour pallet, and the ContrastChecker control will alert us if the contrast between our chosen colours will provide accessibility problems.
We enforce these colours by applying inline styles in both the edit and save methods like so:
style={ {
    backgroundColor: blockBackground,
    color: blockColor,
} }
Use Classes for Styles
The latest guidance does suggest that we should generate classes for our colours using withColors, but using inline styles like this will do for our simple example.
Define a Custom Block Pallet
It is worth noting that you can add your own colours and gradients to the colour pallet using syntax similar to the following:
  setAttributes( { blockColor } ),
      label: __( 'Font Color', 'wholesome-plugin' ),
      colors: [
        {
          color: '#21759b',
          name: __( 'Blue', 'wholesome-plugin' ),
          slug: 'blue',
        },
        {
          color: '#ffffff',
          name: __( 'White', 'wholesome-plugin' ),
          slug: 'white',
        },
      ]
    },
    {
      value: blockBackground,
      onChange: ( blockBackground ) =>  setAttributes( { blockBackground } ),
      label: __( 'Background Color', 'wholesome-plugin' ),
      colors: [
        {
          color: '#21759b',
          name: __( 'Blue', 'wholesome-plugin' ),
          slug: 'blue',
        },
        {
          color: '#ffffff',
          name: __( 'White', 'wholesome-plugin' ),
          slug: 'white',
        }
      ]
    }
  ] }>
This will override our theme colours for the block.
Setting custom colours for our block
Add a Toggle to Enable Draft Blocks
Finally let’s add a ToggleControl into the InspectorControls to allow us to create Draft Blocks, similar to what my Wholesome Publishing plugin does. Ideally this should be created as a Higher Order Component (HoC) and applied to all blocks, but that is the subject for the next guide.
Add an additional attribute into the plugin:
isBlockDraft: {
    default: false,
    type: 'boolean',
},
And update your /src/edit.js to the following:
import { ContrastChecker, InspectorControls, PanelColorSettings, RichText, useBlockProps } from '@wordpress/block-editor';
import { Panel, PanelBody, TextControl, ToggleControl } from '@wordpress/components';
import { __ } from '@wordpress/i18n';

import './editor.scss';

export default function Edit( { attributes, isSelected, setAttributes } ) {
    const { blockBackground, blockColor, blockText, isBlockDraft } = attributes;
    return [
        <InspectorControls>
            <Panel>
                <PanelBody
                    title={ __( 'Block Content Settings', 'wholesome-plugin' ) }
                    icon="admin-plugins"
                >
                    <TextControl
                        label={ __( 'Example Meta', 'wholesome-plugin' ) }
                        help={ __( 'This is an example meta field.', 'wholesome-plugin' ) }
                        onChange={ ( blockText ) => setAttributes( { blockText } ) }
                        value={ blockText }
                    />
                </PanelBody>
                <PanelColorSettings
                    title={ __( 'Block Color Settings', 'wholesome-plugin' ) }
                    icon="art"
                    initialOpen={ false }
                    colorSettings={ [
                        {
                            value: blockColor,
                            onChange: ( blockColor ) =>  setAttributes( { blockColor } ),
                            label: __( 'Font Color', 'wholesome-plugin' ),
                        },
                        {
                            value: blockBackground,
                            onChange: ( blockBackground ) =>  setAttributes( { blockBackground } ),
                            label: __( 'Background Color', 'wholesome-plugin' ),
                        }
                    ] }>
                        <ContrastChecker
                            isLargeText="false"
                            textColor={blockColor}
                            backgroundColor={blockBackground}
                        />
                </PanelColorSettings>
                <PanelBody
                    title={ __( 'Block Display Settings', 'wholesome-plugin' ) }
                    icon="visibility"
                >
                    <ToggleControl
                        checked={ isBlockDraft }
                        label={ __( 'Set Block as Draft', 'wholesome-plugin' ) }
                        help={ __( 'If the block is set to draft it will not show on the front end..', 'wholesome-plugin' ) }
                        onChange={ ( isBlockDraft ) => setAttributes( { isBlockDraft } ) }
                    />
                </PanelBody>
            </Panel>
        </InspectorControls>,
        <p
            { ...useBlockProps({ className: isBlockDraft ? 'draft-block' : '' }) }
            style={ {
                backgroundColor: blockBackground,
                color: blockColor,
            } }
        >
            <RichText
                className="block__text"
                keepPlaceholderOnFocus
                onChange={ ( blockText ) => setAttributes( { blockText } ) }
                placeholder={ __( 'Block Text', 'wholesome-plugin' ) }
                tagName="span"
                value={ blockText }
            />
        </p>
    ];
}
Note that we are using a ToggleControl to toggle our draft mode on and off, and we use the attribute to apply a new class to our document by passing className into useBlockProps.
Handle the Styles
Add the following SCSS to /src/editor.scss to give our draft control a bit of distinction (there are better ways to do this, but I’m keeping it light for example purposes).
.draft-block {

    &::before {
        background: #cfcfcf;
        background-image: linear-gradient(45deg, #efefef 8.33%, #cfcfcf 8.33%, #cfcfcf 50%, #efefef 50%, #efefef 58.33%, #cfcfcf 58.33%, #cfcfcf 100%);
        background-size: 8.49px 8.49px;
        color: black;
        content: 'Draft Block';
        display: block;
        font-family: monospace;
        font-size: 1rem;
        padding-left: 5px;
    }

    opacity: .4;

    &.is-selected {
        opacity: .6;
    }
}
Control the Front End Render with PHP
We don’t need to do anything to our save function, instead we are going to use a PHP filter to prevent the block from rendering if it is set to draft.
Add the following to the root file of the plugin (in our case wholesome-plugin.php).
function wholesomecode_wholesome_plugin_remove_blocks_in_draft( $pre_render, $block ) {

    // If we are in the admin interface, bail.
    if ( is_admin() ) {
        return $pre_render;
    }

    // If the block is draft, do not render.
    if (
        isset( $block['attrs'] ) &&
        isset( $block['attrs']['isBlockDraft'] ) &&
        $block['attrs']['isBlockDraft']
    ) {
        return false;
    }

    // Otherwise, render the block.
    return $pre_render;
}
add_filter( 'pre_render_block', 'wholesomecode_wholesome_plugin_remove_blocks_in_draft', 0, 2 );
The Draft Block Action
Let’s take a look at what we have built.
The draft block toggle in action
Extra: Taking it Further
- Have a look at creating nested child blocks with the
InnerBlockscomponent - Have a look at using post meta fields in Gutenberg blocks
- Add a sidebar to core and third party blocks with filters and higher order components
- Have a go at adding controls to the post sidebar
- Have a go at creating a standalone custom sidebar