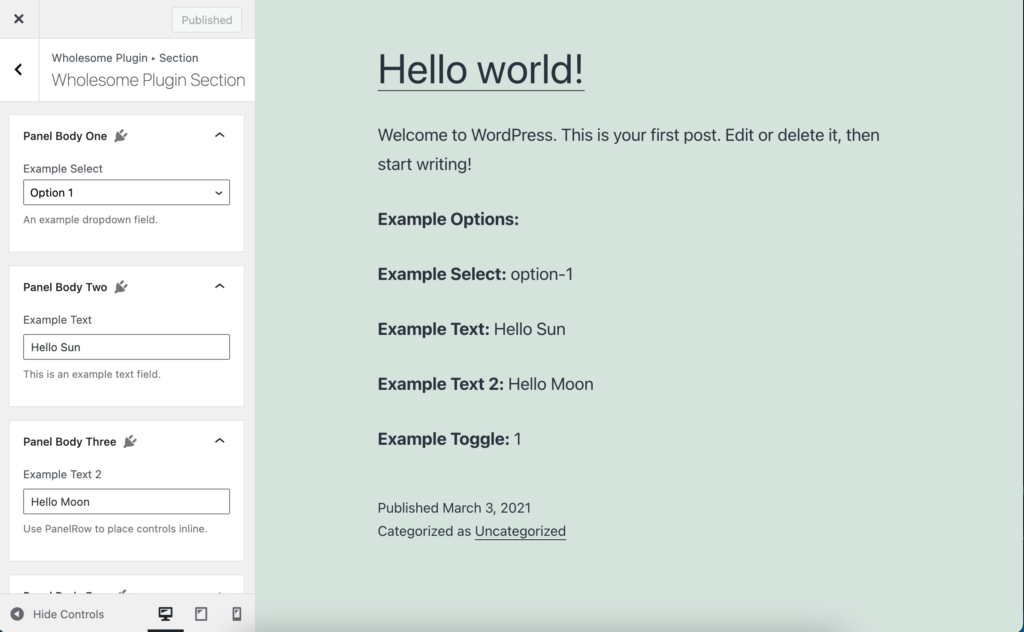
In our last guide we looked at creating a settings page using WordPress Block Editor (Gutenberg) components. In this guide we are going to take it even further and use Gutenberg components inside the WordPress Customizer.

The Customizer with Gutenberg Components
Prerequisites
- Have followed the Creating a Plugin for the WordPress Block Editor (Gutenberg) guide
- Have followed the Using Options to Store Data in the WordPress Block Editor (Gutenberg) guide
- Have followed the Add Entry Points to the WordPress Create Block Script guide
- Have followed the Create a Settings Page using WordPress Block Editor (Gutenberg) Components guide
Create an Entry Point in webpack
Following on from the Add Entry Points to the WordPress Create Block Script guide, create a new entry point in the extended webpack.config.js file that you created in that guide.
const defaultConfig = require( '@wordpress/scripts/config/webpack.config' );
const path = require( 'path' );

module.exports = {
    ...defaultConfig,
    entry: {
        ...defaultConfig.entry,
        customizer: path.resolve( process.cwd(), 'src', 'customizer.js' ),
    }
};
Create two new files in your soloution:
/src/customizer.js/src/customizer.scss
We will use these to create our plugin.
Register the Customizer Settings and Components in PHP
Following on from the guides in the prerequisites, open up the open up the root PHP file of the plugin (in this case wholesome-plugin.php) and add the following:
Register the Customizer Control
We need to create a custom Customizer control. Add the following code to your file which will render a call that outputs the a <div> with an ID that our JavaScript can hook into.
function wholesomecode_wholesome_plugin_customizer_register( $wp_customize ) {

    class Wholesome_Plugin_Gutenberg_Control extends WP_Customize_Control {

        public $type = 'wholesome-plugin-gutenberg-control';

        public function render_content() {}

        public function content_template() {
            ?>
                <div id="wholesome-plugin-customizer"></div>
            <?php
        }
    }

    $wp_customize->register_control_type( 'Wholesome_Plugin_Gutenberg_Control' );
}
add_action( 'customize_register', 'wholesomecode_wholesome_plugin_customizer_register', 10 );
At the bottom of this file we register the control with the register_control_type which allows us to access this control in JavaScript.
Register the Customizer Settings
In the same block of code we need to register the settings that we are going to use in customizer. To do that add the following block of code after the line which does the register_control_type.
// $wp_customize->register_control_type( 'Wholesome_Plugin_Gutenberg_Control' );

$wp_customize->add_setting( 'wholesomecode_wholesome_plugin_example_select' );
$wp_customize->add_setting( 'wholesomecode_wholesome_plugin_example_text' );
$wp_customize->add_setting( 'wholesomecode_wholesome_plugin_example_text_2', [ 'type' => 'option' ] );
$wp_customize->add_setting( 'wholesomecode_wholesome_plugin_example_toggle', [ 'type' => 'option' ] );
Note that the first two settings will be accessible via the default get_theme_mod function, whereas the bottom two settings pass in the arguments 'type' => 'option' which means that these settings will be registered as unique fields within the options table and will be accessible via get_option.
For these bottom two settings we need to ensure they are registered via register_setting and show_in_rest to true for each one, so that they can be accessed via Gutenberg.
Register the ‘Option’ Settings
Register bottom two customizer settings (that we will access via get_option) with the following block of code:
function wholesomecode_wholesome_plugin_register_settings() {
    register_setting(
        'wholesomecode_wholesome_plugin_settings',
        'wholesomecode_wholesome_plugin_example_text_2',
        [
            'default'      => '',
            'show_in_rest' => true,
            'type'         => 'string',
        ]
    );

    register_setting(
        'wholesomecode_wholesome_plugin_settings',
        'wholesomecode_wholesome_plugin_example_toggle',
        [
            'default'      => '',
            'show_in_rest' => true,
            'type'         => 'string',
        ]
    );
}
add_action( 'init', 'wholesomecode_wholesome_plugin_register_settings', 10 );
Enqueue the Scripts
Finally, register the customizer assets with the following code (see the Add Entry Points guide for more information).
function wholesomecode_wholesome_plugin_customizer_scripts() {
    $dir = __DIR__;

    $script_asset_path = "$dir/build/customizer.asset.php";
    if ( ! file_exists( $script_asset_path ) ) {
        throw new Error(
            'You need to run `npm start` or `npm run build` for the "wholesomecode/wholesome-plugin" block first.'
        );
    }
    $customizer_js = 'build/customizer.js';
    $script_asset  = require( $script_asset_path );
    wp_enqueue_script(
        'wholesomecode-wholesome-plugin-customizer-editor',
        plugins_url( $customizer_js, __FILE__ ),
        $script_asset['dependencies'],
        $script_asset['version']
    );
    wp_set_script_translations( 'wholesomecode-wholesome-plugin-block-editor', 'wholesome-plugin' );

    wp_localize_script(
        'wholesomecode-wholesome-plugin-customizer-editor',
        'WholesomePluginSettings',
        [
            'wholesomecode_wholesome_plugin_example_select' => get_theme_mod( 'wholesomecode_wholesome_plugin_example_select', '' ),
            'wholesomecode_wholesome_plugin_example_text'   => get_theme_mod( 'wholesomecode_wholesome_plugin_example_text', '' ),
        ]
    );

    $customizer_css = 'build/customizer.css';
    wp_enqueue_style(
        'wholesomecode-wholesome-plugin-customizer',
        plugins_url( $customizer_css, __FILE__ ),
        ['wp-components'],
        filemtime( "$dir/$customizer_css" )
    );
}
add_action( 'customize_controls_enqueue_scripts', 'wholesomecode_wholesome_plugin_customizer_scripts', 10 );
Note that we also use wp_localize_script in this code block to pass the settings that we will access via get_theme_mod into JavaScript.
Lets have a look at this part of the code in more detail:
wp_localize_script(
  'wholesomecode-wholesome-plugin-customizer-editor',
  'WholesomePluginSettings',
  [
    'wholesomecode_wholesome_plugin_example_select' => get_theme_mod( 'wholesomecode_wholesome_plugin_example_select', '' ),
    'wholesomecode_wholesome_plugin_example_text'   => get_theme_mod( 'wholesomecode_wholesome_plugin_example_text', '' ),
  ]
);
Note that we are using the same setting keys that we registered when we registered the customizer settings with $wp_customize->add_setting earlier (the ones that were not configured to use an option).
Build the Customizer Panel in JavaScript
Add the following code into the /src/customizer.js file.
For the most part, this code (the App component) is a rework of the code from the Create Settings Page guide. It uses the same components and still sets the state from the Settings API, but does away with the save button and the notices area.
import './customizer.scss';

const { api } = wp;

import {
    Panel,
    PanelBody,
    Placeholder,
    SelectControl,
    Spinner,
    TextControl,
    ToggleControl,
} from '@wordpress/components';

import {
    Fragment,
    render,
    Component,
} from '@wordpress/element';

import { __ } from '@wordpress/i18n';

const { customize } = wp;

class App extends Component {
    constructor() {
        super( ...arguments );

        this.state = {
            exampleSelect: '',
            exampleText: '',
            exampleText2: '',
            exampleText3: '',
            exampleToggle: false,
            isAPILoaded: false,
        };
    }

    componentDidMount() {

        api.loadPromise.then( () => {
            this.settings = new api.models.Settings();

            const { isAPILoaded } = this.state;

            if ( isAPILoaded === false ) {
                this.settings.fetch().then( ( response ) => {
                    this.setState( {
                        exampleSelect: WholesomePluginSettings[ 'wholesomecode_wholesome_plugin_example_select' ],
                        exampleText: WholesomePluginSettings[ 'wholesomecode_wholesome_plugin_example_text' ],
                        exampleText2: response[ 'wholesomecode_wholesome_plugin_example_text_2' ],
                        exampleText3: response[ 'wholesomecode_wholesome_plugin_example_text_3' ],
                        exampleToggle: Boolean( response[ 'wholesomecode_wholesome_plugin_example_toggle' ] ),
                        isAPILoaded: true,
                    } );
                } );
            }
        } );
    }

    render() {
        const {
            exampleSelect,
            exampleText,
            exampleText2,
            exampleToggle,
            isAPILoaded,
        } = this.state;

        if ( ! isAPILoaded ) {
            return (
                <Placeholder>
                    <Spinner />
                </Placeholder>
            );
        }

        return (
            <Fragment>
                <div className="wholesome-plugin__main">
                    <Panel>
                        <PanelBody
                            title={ __( 'Panel Body One', 'wholesome-plugin' ) }
                            icon="admin-plugins"
                        >
                            <SelectControl
                                help={ __( 'An example dropdown field.', 'wholesome-plugin' ) }
                                label={ __( 'Example Select', 'wholesome-plugin' ) }
                                onChange={ ( exampleSelect ) => {
                                    this.setState( { exampleSelect } );
                                    customize.value('wholesomecode_wholesome_plugin_example_select')(exampleSelect);
                                }}
                                options={ [
                                    {
                                        label: __( 'Please Select...', 'wholesome-plugin' ),
                                        value: '',
                                    },
                                    {
                                        label: __( 'Option 1', 'wholesome-plugin' ),
                                        value: 'option-1',
                                    },
                                    {
                                        label: __( 'Option 2', 'wholesome-plugin' ),
                                        value: 'option-2',
                                    },
                                ] }
                                value={ exampleSelect }
                            />
                        </PanelBody>
                        <PanelBody
                            title={ __( 'Panel Body Two', 'wholesome-plugin' ) }
                            icon="admin-plugins"
                        >
                            <TextControl
                                help={ __( 'This is an example text field.', 'wholesome-plugin' ) }
                                label={ __( 'Example Text', 'wholesome-plugin' ) }
                                onChange={ ( exampleText ) => {
                                    this.setState( { exampleText } );
                                    customize.value('wholesomecode_wholesome_plugin_example_text')(exampleText);
                                }}
                                value={ exampleText }
                            />

                        </PanelBody>
                        <PanelBody
                            title={ __( 'Panel Body Three', 'wholesome-plugin' ) }
                            icon="admin-plugins"
                        >
                            <TextControl
                                help={ __( 'Use PanelRow to place controls inline.', 'wholesome-plugin' ) }
                                label={ __( 'Example Text 2', 'wholesome-plugin' ) }
                                onChange={ ( exampleText2 ) => {
                                    this.setState( { exampleText2 } );
                                    customize.value('wholesomecode_wholesome_plugin_example_text_2')(exampleText2);
                                }}
                                value={ exampleText2 }
                            />
                        </PanelBody>
                        <PanelBody
                            title={ __( 'Panel Body Four', 'wholesome-plugin' ) }
                            icon="admin-plugins"
                        >
                            <ToggleControl
                                checked={ exampleToggle }
                                help={ __( 'An example toggle.', 'wholesome-plugin' ) }
                                label={ __( 'Example Toggle', 'wholesome-plugin' ) }
                                onChange={ ( exampleToggle ) => {
                                    this.setState( { exampleToggle } );
                                    customize.value('wholesomecode_wholesome_plugin_example_toggle')(exampleToggle);
                                }}
                            />
                        </PanelBody>
                    </Panel>
                </div>
            </Fragment>
        )
    }
}
One notable change is that inside componentDidMount, where the settings are loaded from the API. Note that the two settings that will be accessed via get_theme_mod are accessed using the variable WholesomePluginSettings that we created in the wp_localize_script function earlier in this guide.
this.setState( {
  exampleSelect: WholesomePluginSettings[ 'wholesomecode_wholesome_plugin_example_select' ],
  exampleText: WholesomePluginSettings[ 'wholesomecode_wholesome_plugin_example_text' ],
  exampleText2: response[ 'wholesomecode_wholesome_plugin_example_text_2' ],
  exampleText3: response[ 'wholesomecode_wholesome_plugin_example_text_3' ],
  exampleToggle: Boolean( response[ 'wholesomecode_wholesome_plugin_example_toggle' ] ),
  isAPILoaded: true,
} );
Handle the Save
We don’t really need to do anything special to handle the changes. The only thing we need to do is hook into customize and let the WordPress Customizer handle the save, for example:
onChange={ ( exampleSelect ) => {
  this.setState( { exampleSelect } );
  customize.value('wholesomecode_wholesome_plugin_example_select')(exampleSelect);
}}
In this example the onChange passes the value of the input field (in this case our <select>) and updates the state, and then passes this value into the Customizer via the wp.customize.value() function.
Build the Customizer Section and Panel with JavaScript
At the bottom of the /src/customizer.js file add the following code:
customize.bind('ready', function () {
    const panelKey = 'wholesomecode-wholesome-plugin-customizer-panel';
    const sectionKey = 'wholesomecode-wholesome-plugin-customizer-section';

    customize.panel.add(
        new customize.Panel( panelKey, {
            description: __( 'Wholesome Plugin Example Panel', 'wholesome-plugin' ),
            priority: 1000,
            title: __( 'Wholesome Plugin Panel', 'wholesome-plugin' ),
        })
    );
    customize.section.add(
        new customize.Section( sectionKey, {
            customizeAction: __( 'Wholesome Plugin ▸ Section', 'wholesome-plugin' ),
            panel: panelKey,
            title: __( 'Wholesome Plugin Section', 'wholesome-plugin' ),
        })
    );

    customize.control.add(
        new customize.Control( 'wholesomecode-wholesome-plugin-customizer-gutenberg-control', {
            section: sectionKey,
            type: 'wholesome-plugin-gutenberg-control',
        })
    );

    const htmlOutput = document.getElementById( 'wholesome-plugin-customizer' );
    if ( htmlOutput ) {
        render(
            <App />,
            htmlOutput
        );
    }
});
This code creates Customizer section and Panel in JavaScript.
The code also adds our custom Gutenberg control by registering a new customize.Control class, and passing in the type with the same name as the type we set when we registered the control in PHP.
We also use this code to find the <div> we registered in our custom Gutenberg control and render the Gutenberg Components into this <div>.
Add the SCSS
We need to tidy up the panel a little by adding the following SCSS into /src/customizer.scss:
#wholesome-plugin-customizer {

    .components-placeholder {
        background: #f1f1f1;
    }

    .wholesome-plugin__main {
        margin-left: auto;
        margin-right: auto;

        .components-panel {
            background: none;
            border: none;
        }

        .components-panel__body {
            background: #ffffff;
            border: 1px solid #e2e4e7;
            margin-bottom: 1rem;
        }
    }

    .components-base-control__help {
        margin-top: .5rem;
    }

    .components-panel__row {
        > div {
            flex-grow: 1;
            margin-right: 1rem;

            &:last-of-type {
                margin-right: 0;
            }
        }
    }

    .wholesome-plugin__notices {
        .components-snackbar {
            bottom: .5rem;
            position: fixed;
        }
    }
}
Viewing the Customizer
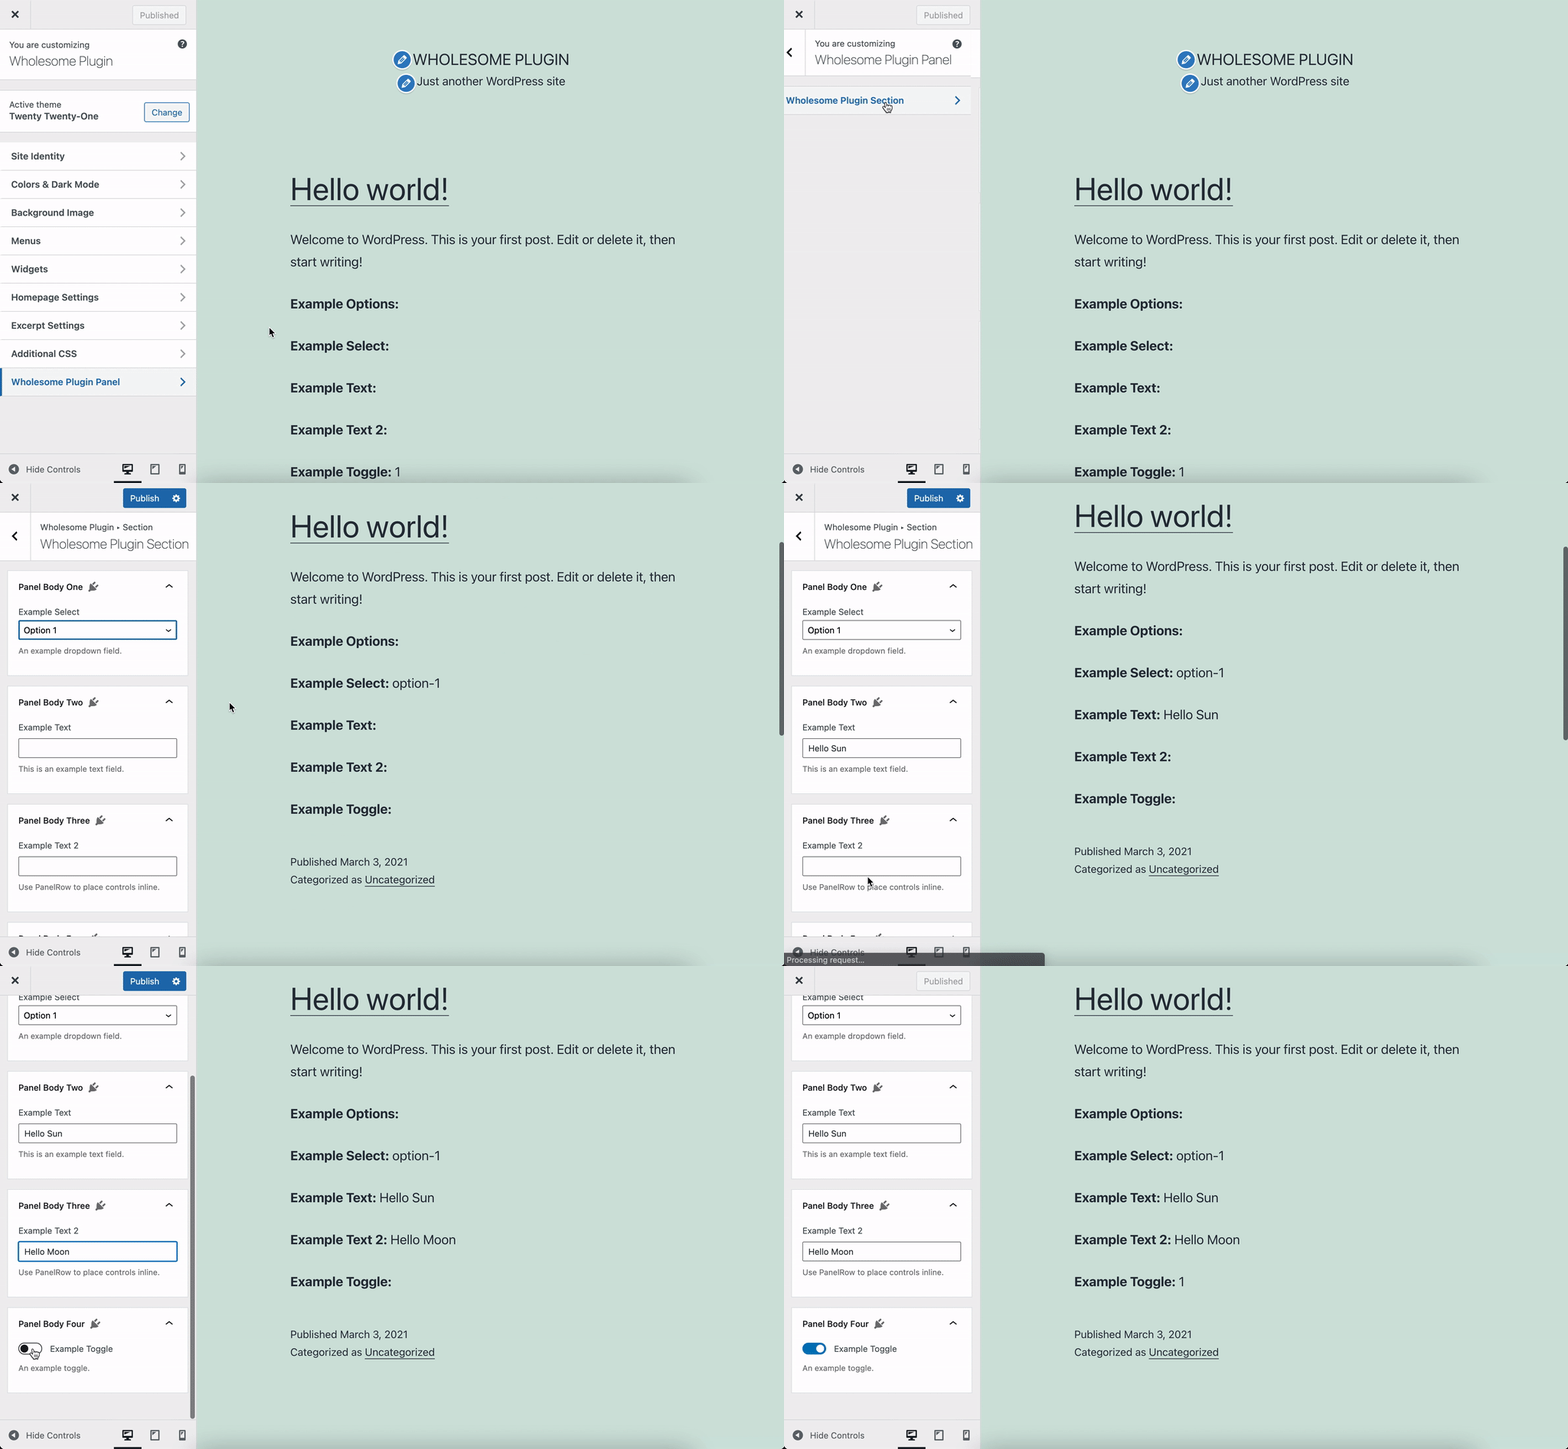
Navigate to the WordPress Customizer, and view the Gutenberg Customizer Panel in Action:

The Customizer with Gutenberg Components
Extra: Taking it Further
- Have a look at creating nested child blocks with the
InnerBlockscomponent - Have a look at using post meta fields in Gutenberg blocks