If you are new to the WordPress Block Editor (Gutenberg) you may be wondering how to get started with creating your own plugin.
Luckily the WordPress development team have a handy npm script for you to create a block plugin that creates a starter block so you can quickly get up and running.
By default the kind of WordPress plugin this creates is a ‘block’, but it also gives us a good starter point for other kinds of Gutenberg plugins.
Prerequisites
- Node must be installed on your machine so you can use the
npmcommand (Which stands for Node Package Manager) - WordPress installation
- Code Editor
- Access to the Terminal
Create your Plugin
After you have installed node on your machine, you should have access to the npm command in your terminal.
Open up your terminal, and make sure that you have cd‘d (Changed Directory) to the plugins folder in your WordPress installation (eg cd wp-content/plugins).
Once there run the following command:
npm init @wordpress/blockThis will download everything the script needs to start the build. Once it has finished, the script will ask you a series of questions that are needed to configure your plugin.
Using the Terminal to Run the Create Script
Configuration Questions
The script will ask the following questions, here are my example replies:
- The block slug used for identification (also the plugin and output folder name) — I want my block to be called
Wholesome Plugin, so I enteredwholesome-plugin. - The internal namespace for the block name (something unique for your products) — As this should be unique for all of my products I entered
wholesomecode, as this is my company name. - The display title for your block — I entered the title of the plugin,
Wholesome Plugin. - The short description for your block (optional) — I entered “
An example plugin to demonstrate the create-block-script“. - The dashicon to make it easier to identify your block (optional) — Quickly bringing up the WordPress Dashicons resource, I chose
admin-pluginsas it has a plugin icon. Remember to omit dashicon- from the dashicon prefix when doing this. - The category name to help users browse and discover your block (use arrow keys) — I chose
design. Although a custom category would probably be a better fit. - The name of the plugin author (optional). Multiple authors may be listed using commas — I entered
wholesomecode. - The short name of the plugin’s license (optional) — I pressed enter to accept GPL v2.0 or later.
- A link to the full text of the license (optional) — I pressed enter to insert the GPL v2.0 licence URL.
- The current version number of the plugin — I pressed enter to insert
0.1.0.
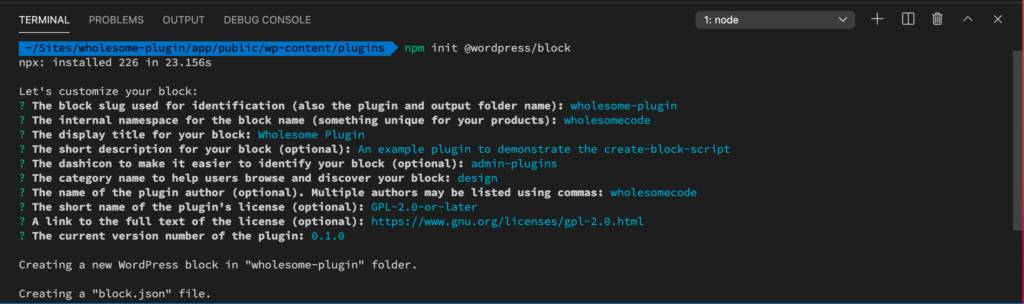
Script Configuration Questions
The script will then finish running.
What just happened?
A few things happen while the script is running, these are:
- It creates the folder of the plugin,
- It generates all of the plugin files (see exploring the plugin for the details of what these do)
- It installs the dependancies it needs, including the
@wordpress/scriptspackage (this does the heavy lifting in terms of building the plugin) - It compiles the code
- It outputs a list of commands that you can use
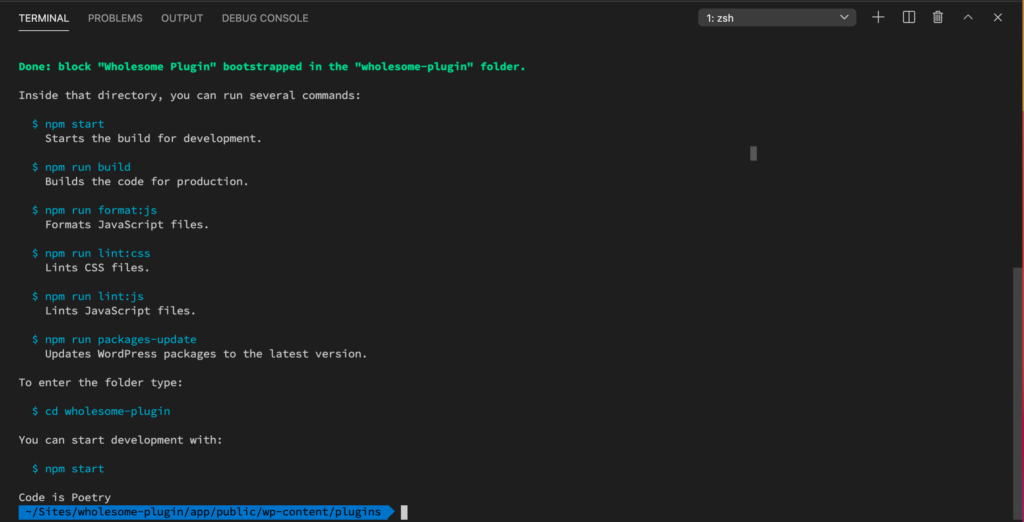
Build Commands
We will explore these more in the exploring the plugin section.
Using the Plugin
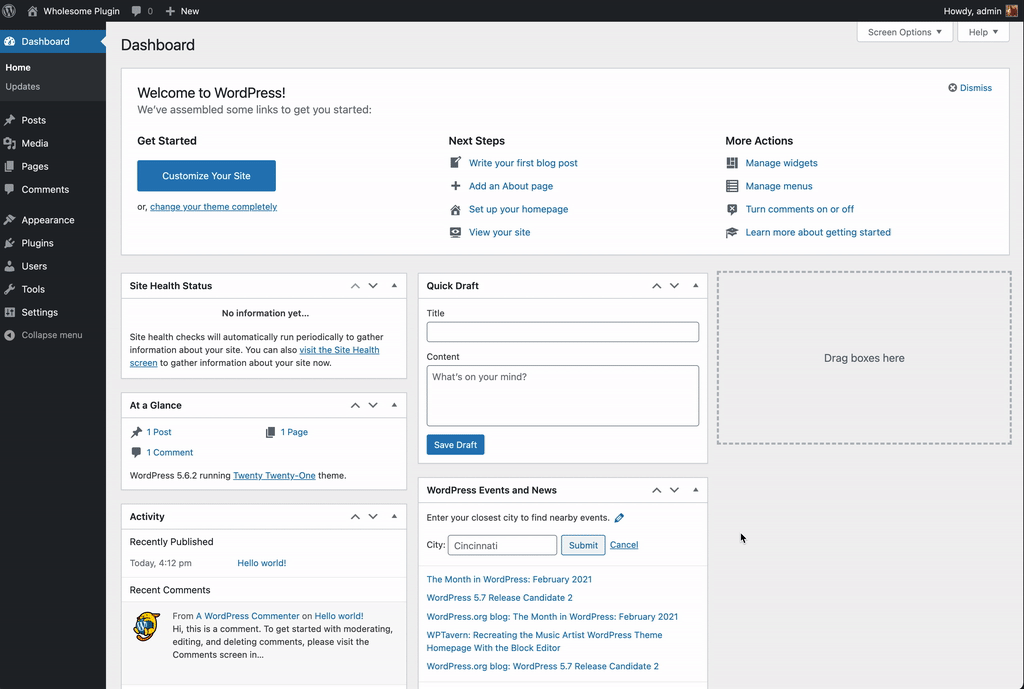
Before you can use the plugin, you will need to activate it. You can do this by choosing Plugins from the WordPress admin menu, and then selecting activate under the name of the plugin.
Activate the Plugin
Now you need to edit a post in WordPress and insert the plugin using the Gutenberg editor.

Inserting the Block Into a Post
Note that the plugin does not do much be default, it just creates a Block. It does however provide a framework for you to use to build your own plugin.
Viewing the Block on the Front End
By default the block looks like this on the front end. Note that it does have a slightly different appearance, this is deliberate so you can get familiar with the CSS on the front and the backend of WordPress.
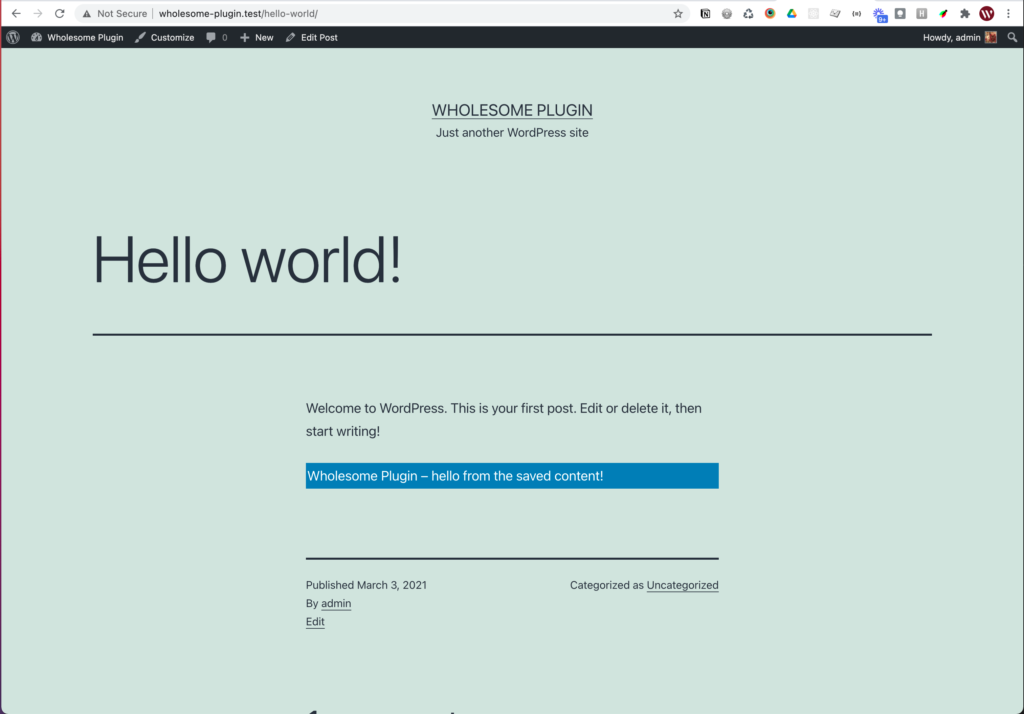
The Block on the Front End
Exploring the Plugin
The whole purpose of the Create Block Script is for you to create your own plugin. Let’s explore the files that it generated in more detail:
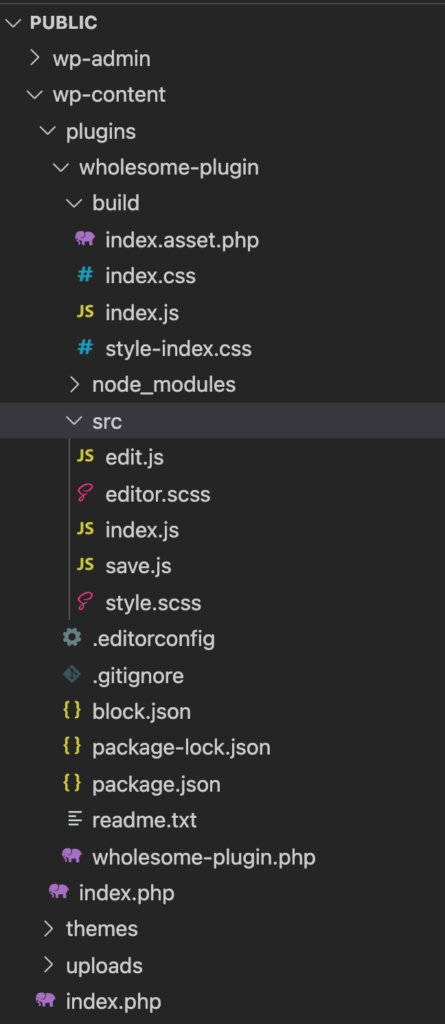
Generated Files
wholesome-plugin — This is the root folder of the plugin, it has the same name as the one I entered for the ‘slug’ in the setup questions.
**/build** — This is the build folder. It contains all the JavaScript and PHP assets generated from the /src folder. These are enqueued via the main wholesome-notes.php loader file.
**/build/index.assets.php** — This PHP file is autogenerated when the /src folder is compiled. It contains an array of all the WordPress Editor (Gutenberg) JavaScript decencies used by your plugin. It is enqueued via the main wholesome-plugin.php loader file.
**/build/index.css** — This is the editor CSS file, and is enqueued via the main wholesome-plugin.php loader file.
**/build/index.js** — This is the main compiled JavaScript file, and is enqueued via the main wholesome-plugin.php loader file.
**/build/style-index.css** — This is the front end CSS file, and is enqueued via the main wholesome-plugin.php loader file.
**/build/index.js.map** — This file is only generated when you are compiling the assets for development mode (IE you run npm start and not npm build when you are compiling your assets. It is a helpful file for JavaScript debuggers to help identify file names and line numbers if errors occur.
**/node_modules**— This is the folder that all the JavaScript dependancies for your plugin are installed into.**/src**— This is the folder that contains all of the uncompiled assets for your plugin.**/src/edit.js**— This is the edit function of the block, and controls how the block is displayed in the block editor when it is in edit mode.**/src/editor.scss**— This is the uncompiled SCSS for the editor, this will compile into/build/index.css.**/src/index.js**— This is the main uncompiled JavaScript file for your WordPress Editor (Gutenberg) block. It registers the block and contains default settings.**/src/save.js**— This is the save function of the block, and controls the markup of the block when it is saved.**/src/style.scss**— This is the uncompiled SCSS for the front end, this will compile into/build/style-index.css.**/.editorconfig**— This file contains useful presets for your IDE (Integrated Development Environment), such as Visual Studio Code.**/.gitignore**— This file tells git to ignore certain files when you are committing to a git repository (such as GitHub).**/editor.css**— The styles in this file are output in the editor only, it is enqueued via the mainwholesome-notes.phploader file.**/block.json**— This file defines the plugin so it can be discovered by the WordPress block library. If you make changes to the plugin, ensure that this file is updated. In newer versions of the NPM script, this file is used instead of/src/index.jsto register your block.**/package.json**— This file contains all of the npm dependancies for the plugin, and the commands that you can run. Note that the plugin utiliseswp-scripts(@wordpress/scripts) as its base, so initially the dependancies loaded are for that package.**/readme.txt**— This file is a WordPress plugin repository readme file, which is required if you want the block to be listed on the plugin repository.**/wholesome-plugin.php**— This is the main loader file for the plugin. Its name was set via the ‘slug’ that we entered in the initial setup script. It enqueues all of the JavaScript assets needed for the plugin.
Exploring the Build Commands
Before we can run our build commands we need to make sure we are in the plugin folder. In this example we would run cd wholesome-plugin in the terminal to change directory to our plugin folder.
We can then run the following commands:
**npm start**— Starts the build for development. If you make a change to the plugin you must do this for the changes to show (you will likely need to refresh your browser too).**npm run build**— Builds the code for production. Do this if you are creating a release version of the plugin.**npm run format:js**— Auto-formats the JavaScript files, using best practice.**npm run lint:css**— Lints (looks for errors in) CSS files.**npm run lint:js**— Lints (looks for errors in) JavaScript files.**npm run packages-update**— Updates WordPress packages to the latest version.
We will use one or more of these when modifying the plugin.
Modifying the Plugin
Let’s start by making our block editable.
Add Attributes to /src/index.js
Open up /src/index.js in your editor and add the following inside the registerBlockType function, under apiVersion:
attributes: {
  blockText: {
    default: 'Wholesome Plugin – hello from the editor!',
    type: 'string',
  },
},
This will give us a place to store the data in our plugin called blockText accessible via the attributes property (prop). Note that we have given it a default of the original text generated by the create plugin script.
Add RichText to /src/edit.js
Open up /src/edit.js in your editor and replace the import for useBlockProps with the following:
import { RichText, useBlockProps } from '@wordpress/block-editor';This will let us use the RichText component in our edit render method.
Then change the entire Edit function to the following:
export default function Edit( { attributes, setAttributes } ) {
    const { blockText } = attributes;
    return (
        <p { ...useBlockProps() }>
            <RichText
                className="block__text"
                keepPlaceholderOnFocus
                onChange={ ( blockText ) => setAttributes( { blockText } ) }
                placeholder={ __( 'Block Text', 'wholesome-plugin' ) }
                tagName="span"
                value={ blockText }
            />
        </p>
    );
}
This sets the value of the RichText component to be the same as the one stored in the blockText attribute, and the onChange property sets the blockText attribute to what ever has been entered into the RichText component.
Output the Attributes in /src/save.js
Open up /src/save.js in your editor and replace the save function with the following:
export default function save( { attributes } ) {
    const { blockText } = attributes;
    return (
        <p {="" ...useblockprops.save()="" }="">
            { blockText }
        </p>
    );
}
This simply outputs the value of blockText into the paragraph.
Compiling the Plugin
Open the terminal, make sure you are in the root directory of your plugin and run the following command:
npm startThe script will compile. If you have any errors the terminal should make you aware of what they are.

Building the Plugin
Inserting the Plugin
Make sure you have refreshed your post. The previous version of the block may now be broken, this is fine, just delete it and insert a new one.
Insert the block using the plus symbol from the top left of the editor, and when it is inserted click on its text. You should. now be able to edit the text.
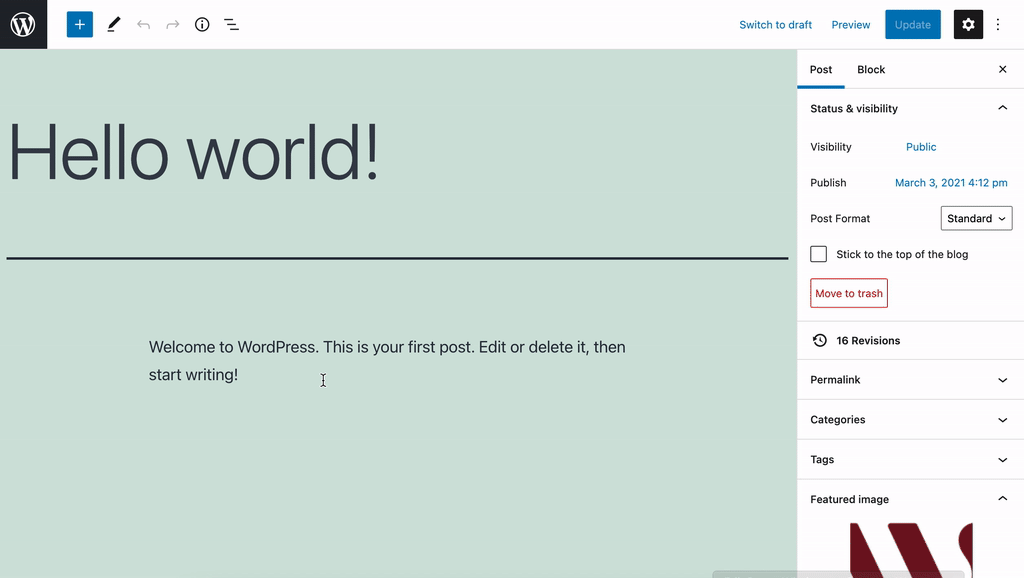
Inserting the Editable Block
Viewing the Plugin
Save the post and View it on the front end of the website, the text you altered should be displayed instead of the original text.
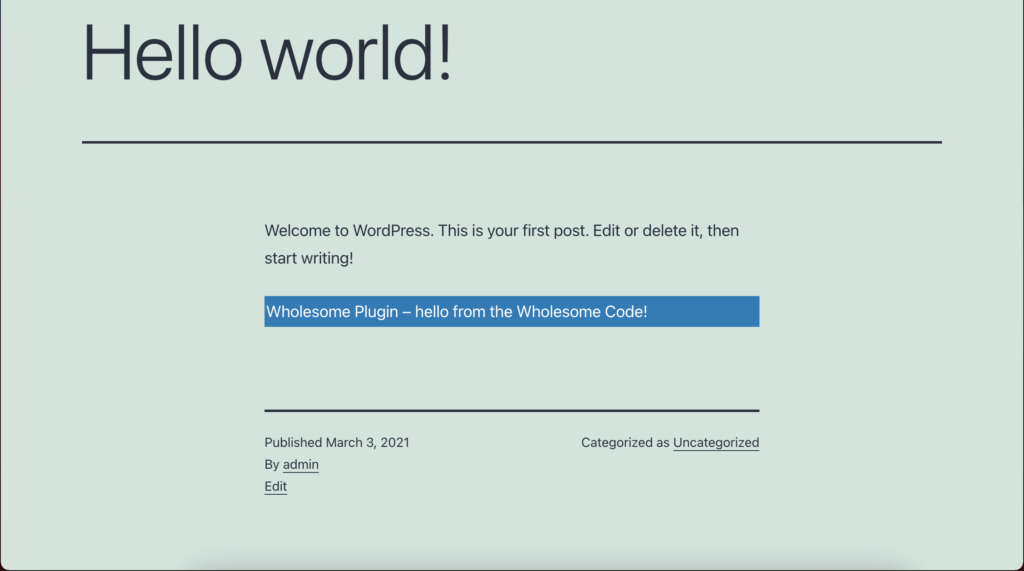
Editable Block on the Front End of the Website
Extra: Custom Block Categories
If you would like your blocks to show up in a custom block category, just add the following code to the root of your plugin (in this case wholesome-plugin.php:
function wholesomecode_wholesome_plugin_block_categories( $categories ) {
    return array_merge(
        $categories,
        [
            [
                'slug'  => 'wholesome-blocks',
                'title' => __( 'Wholesome Blocks', 'wholesome-boilerplate' ),
            ],
        ]
    );
}
add_action( 'block_categories', 'wholesomecode_wholesome_plugin_block_categories', 10, 2 );
This will register a custom block category in your block inserter.
Then all you need to do is adjust the category argument of the registerBlockType function in /src/index.js to refer to your block category and recompile:
/**
 * Blocks are grouped into categories to help users browse and discover them.
 * The categories provided by core are `text`, `media`, `design`, `widgets`, and `embed`.
 */
category: 'wholesome-blocks',
Now when you come to insert your block, you will find it in your newly created block category:

Custom Block Category in the Block Inserter