With official support from the WordPress Editor (Gutenberg) team, you can now quickly get up and running with a block plugin using the WordPress Create Block Script (@wordpress/create-block npm package).
This article is for an older version of the Create Block Script
Although the theory can still be applied, some of the information in this article may no longer be compatible with the latest create block script. You can view our updated Create Block Script Guide here.
We also have an updated guide about adding additional entry points to webpack.
In this article we explore how you can add a custom webpack.config to expand the wp-scripts compiling functionality of the block generated by the block.
With this we can expand npm start command to run additional tasks. In this case we are going to configure the plugin to compile Sass (sass, scss) into css.
We will compile the Sass from the /src folder into the style.css and editor.css files at the root of the plugin.
Create Our Sass Files
The first thing we are going to do is create a new folder at /src/scss. In here we will add two files:
/src/scss/editor.scss/src/scss/style.scss
We will copy the css from the /editor.css and /style.css files into the newly created files.
Then we will delete the /editor.css and /style.css files.
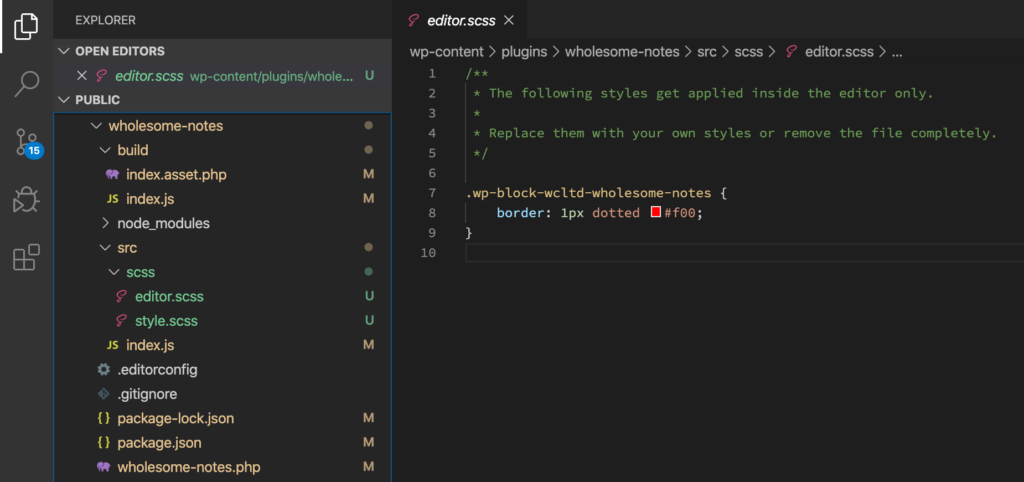
SCSS Files and the new folder structure.
Import the Sass into /src/index.js
At the top of your /src/index.js add the following statements:
import './scss/editor.scss';
import './scss/style.scss';
This will enable webpack to pickup the .scss files so that they can be processed.
By importing the Sass at the top of our file in this way, it will enable us to compile the Sass for multiple blocks within the same plugin into a single file. In this instance it will compile the Sass down into single /editor.css and /style.css files for the entire plugin.
Setup the webpack.config
Create a new file at the root of the plugin called /webpack.config.js. Copy the following code into that file:
const defaultConfig = require( '@wordpress/scripts/config/webpack.config' );

module.exports = {
    ...defaultConfig,
    module: {
        ...defaultConfig.module,
        rules: [
            ...defaultConfig.module.rules,
        ]
    }
};
Now in your terminal enter the following command cd‘ed into the root of the plugin:
npm startThe plugin should compile the JavaScript into the build folder as normal.
Installing a Package to Compile Sass
We are going to use the mini-css-extract-plugin npm package to create .css files from our Sass, to do this we also need a couple of additional packages to process the .scss files into CSS first.
We will install the scss-loader npm package, to allow us to compile CSS to Sass. this has a dependancy of node-scss.
We will also install the css-loader npm package to allow us to handle @import statements in the CSS.
npm install mini-css-extract-plugin css-loader sass-loader node-sass --save-devNow extend the /webpack.config.js file so it looks like the following:
const defaultConfig = require( '@wordpress/scripts/config/webpack.config' );
const MiniCssExtractPlugin = require( 'mini-css-extract-plugin' );

module.exports = {
    ...defaultConfig,
    module: {
        ...defaultConfig.module,
        rules: [
            ...defaultConfig.module.rules,
            {
                test: /.s[ac]ss$/i,
                use: [
                    { loader: MiniCssExtractPlugin.loader },
                    { loader: 'css-loader' },
                    { loader: 'sass-loader' },
                ],
            },
        ],
    },
    plugins: [
        ...defaultConfig.plugins,
        new MiniCssExtractPlugin( {
            filename: '../[name].css',
        } ),
    ],
};
On line 2 we have imported the mini-css-extract-plugin, on line 20 we have declared it as a plugin, and passed in ../[name].css as the filename. This means the compiled file will be added to the root of the plugin.
On line 10 we have passed in an object that has a test parameter, which uses a regex to indicate the kind of file that we are checking for and a use parameter.
The use parameter contains an array of all the plugins that we are going to apply for that test. It runs the plugins from the bottom of the list, ending at the top.
Now if we run npm start it will produce a .css file in the root of the plugin.
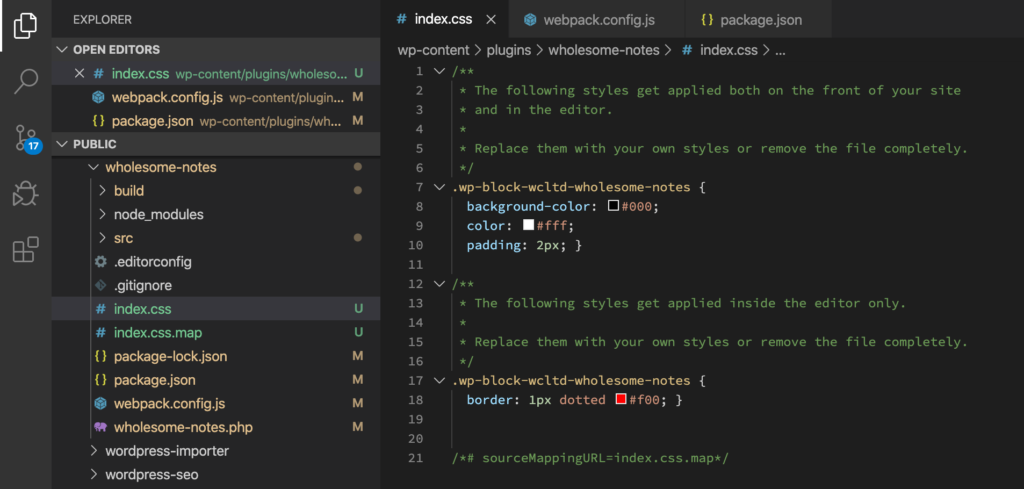
Generating a CSS File.
Looking at the file structure we have two additional files:
/index.css/index.css.map
(We also get a couple of JavaScript files in the /build folder, but I’ll explain how to deal with these later).
The .map file is a pointer that indicates to your JavaScript console which file some CSS or Sass was originally defined in, and helps with debugging.
Examining the /index.css file, it contains the code from both the /src/scss/editor.scss and /src/scss/style.scss files.
This is not what we want, as the style and editor files are enqueued separately in our plugins php file.
Splitting the CSS File
To split this /index.css file we need to take advantage of webpack 4’s optimization.splitChunks object. For more information about its configuration read the splitChunks documentation page.
Add the following to your /webpack.config.js file:
const defaultConfig = require( '@wordpress/scripts/config/webpack.config' );
const MiniCssExtractPlugin = require( 'mini-css-extract-plugin' );

module.exports = {
    ...defaultConfig,
    module: {
        ...defaultConfig.module,
        rules: [
            ...defaultConfig.module.rules,
            {
                test: /.s[ac]ss$/i,
                use: [
                    { loader: MiniCssExtractPlugin.loader },
                    { loader: 'css-loader' },
                    { loader: 'sass-loader' },
                ],
            },
        ],
    },
    optimization: {
        ...defaultConfig.optimization,
        splitChunks: {
            cacheGroups: {
                default: false,
                editor: {
                    chunks: 'all',
                    enforce: true,
                    name: 'editor',
                    test: /editor.s[ac]ss$/i,
                },
                style: {
                    chunks: 'all',
                    enforce: true,
                    name: 'style',
                    test: /style.s[ac]ss$/i,
                },
            },
        },
    },
    plugins: [
        ...defaultConfig.plugins,
        new MiniCssExtractPlugin( {
            filename: '../[name].css',
        } ),
    ],
};
Delete the previously generated files and the build folder and run npm start.
We now get the following files:
/build/editor.js/build/editor.js.map/build/style.js/build/style.js.map/editor.css/editor.css.map/style.css/style.css.map
Looking at /editor.css and /style.css these have been generated correctly, and contain the code that we want!
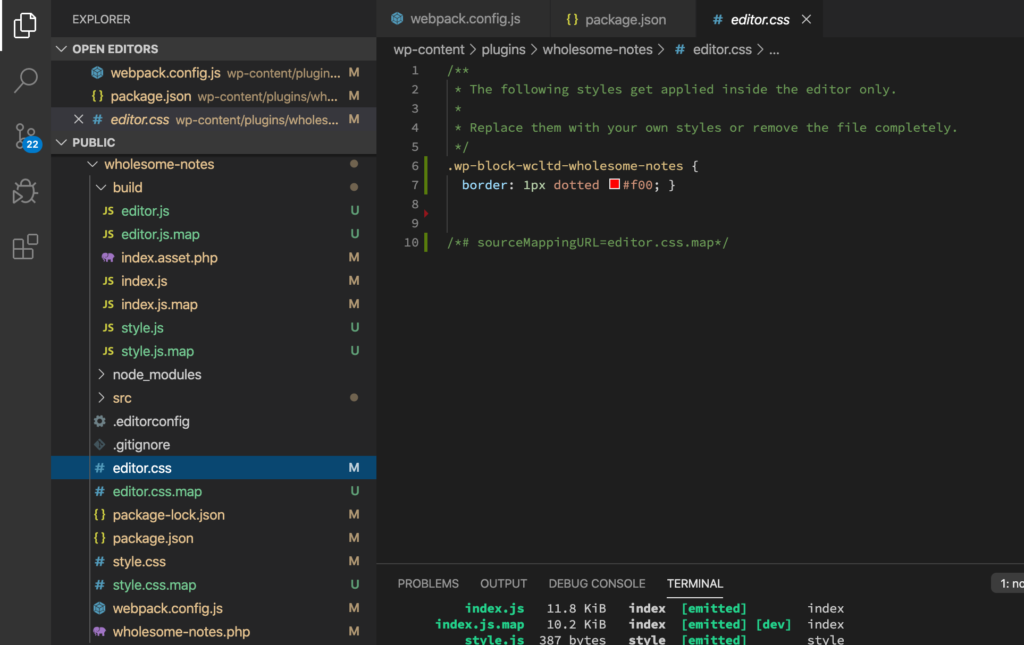
Generating the editor and style CSS Files.
The files in the /build folder are not needed for our setup, I will explore how we can remove these next.
Removing Unwanted Files
To remove unwanted files we are going to use the ignore-emit-webpack-plugin npm package.
This plugin prevents webpack from outputting (or ’emiting’ certain files).
Install the npm package with the terminal command:
npm install ignore-emit-webpack-plugin --save-devModify your /webpack.config.js file to include the configuration for the Ignore Emit webpack Plugin.
const defaultConfig = require( '@wordpress/scripts/config/webpack.config' );
const IgnoreEmitWebPackPlugin = require( 'ignore-emit-webpack-plugin' );
const MiniCssExtractPlugin = require( 'mini-css-extract-plugin' );

module.exports = {
    ...defaultConfig,
    module: {
        ...defaultConfig.module,
        rules: [
            ...defaultConfig.module.rules,
            {
                test: /.s[ac]ss$/i,
                use: [
                    { loader: MiniCssExtractPlugin.loader },
                    { loader: 'css-loader' },
                    { loader: 'sass-loader' },
                ],
            },
        ],
    },
    optimization: {
        ...defaultConfig.optimization,
        splitChunks: {
            cacheGroups: {
                default: false,
                editor: {
                    chunks: 'all',
                    enforce: true,
                    name: 'editor',
                    test: /editor.s[ac]ss$/i,
                },
                style: {
                    chunks: 'all',
                    enforce: true,
                    name: 'style',
                    test: /style.s[ac]ss$/i,
                },
            },
        },
    },
    plugins: [
        ...defaultConfig.plugins,
        new IgnoreEmitWebPackPlugin( [ 'editor.js', 'style.js' ] ),
        new MiniCssExtractPlugin( {
            filename: '../[name].css',
        } ),
    ],
};
Note the new references on line 2, which includes the Ignore Emit plugin, and on line 41 which tells the plugin which files not to Emit.
Now when we run npm start (after deleting the /build folder) the /build/editor.js, /build/editor.js.map, /build/style.js and /build/style.js.map are no longer created.
Production Only Output
If we want to have product only output and exclude the .map files, we can simply pass devtool: false as a parameter into our module.exports object, and this will prevent the .map files from being generated.
Because we only want these files to be excluded on a production server, we can check the process.env.NODE_ENV setting to see what our current environment is set to, and pass in devtool: false if the environment is set to production.
To do this, add the following to the top of our /webpack.config.js file:
const production = 'development' !== process.env.NODE_ENV;Then add the following to the bottom of the file:
if ( production ) {
    module.exports.devtool = false;
}
If the npm start command is ran, and the node environment is not set to production, the .map files will not be created.